Installation Manual
This manual walks you through the whole journey: requesting access, downloading your personal package, running the setup wizard on Windows, macOS or Linux, logging in for the first time, activating your licence, configuring your fleet, updating, backing up, and troubleshooting. Everything runs inside Docker containers.
setup.ps1 / setup.sh wizard automatically sets up PostgreSQL, Redis, the backend API, and the web app. No manual database or Node.js setup required.How you get SeaVesselManager
Request access
Submit the form at seavesselmanager.com/request-access. A human reviews every request.
Receive your personal link
On approval — usually within one business day — you get an email with a private download link, valid for 7 days and usable up to 3 times.
Extract and run the bundled wizard
Unzip svm-server-package-<version>.zip and run setup.ps1 (Windows) or setup.sh (macOS/Linux) from inside the extracted folder.
Log in, then activate your licence
Open http://localhost:3000. The system runs for 30 days without a licence; then activate the free Community Edition key support issues you.
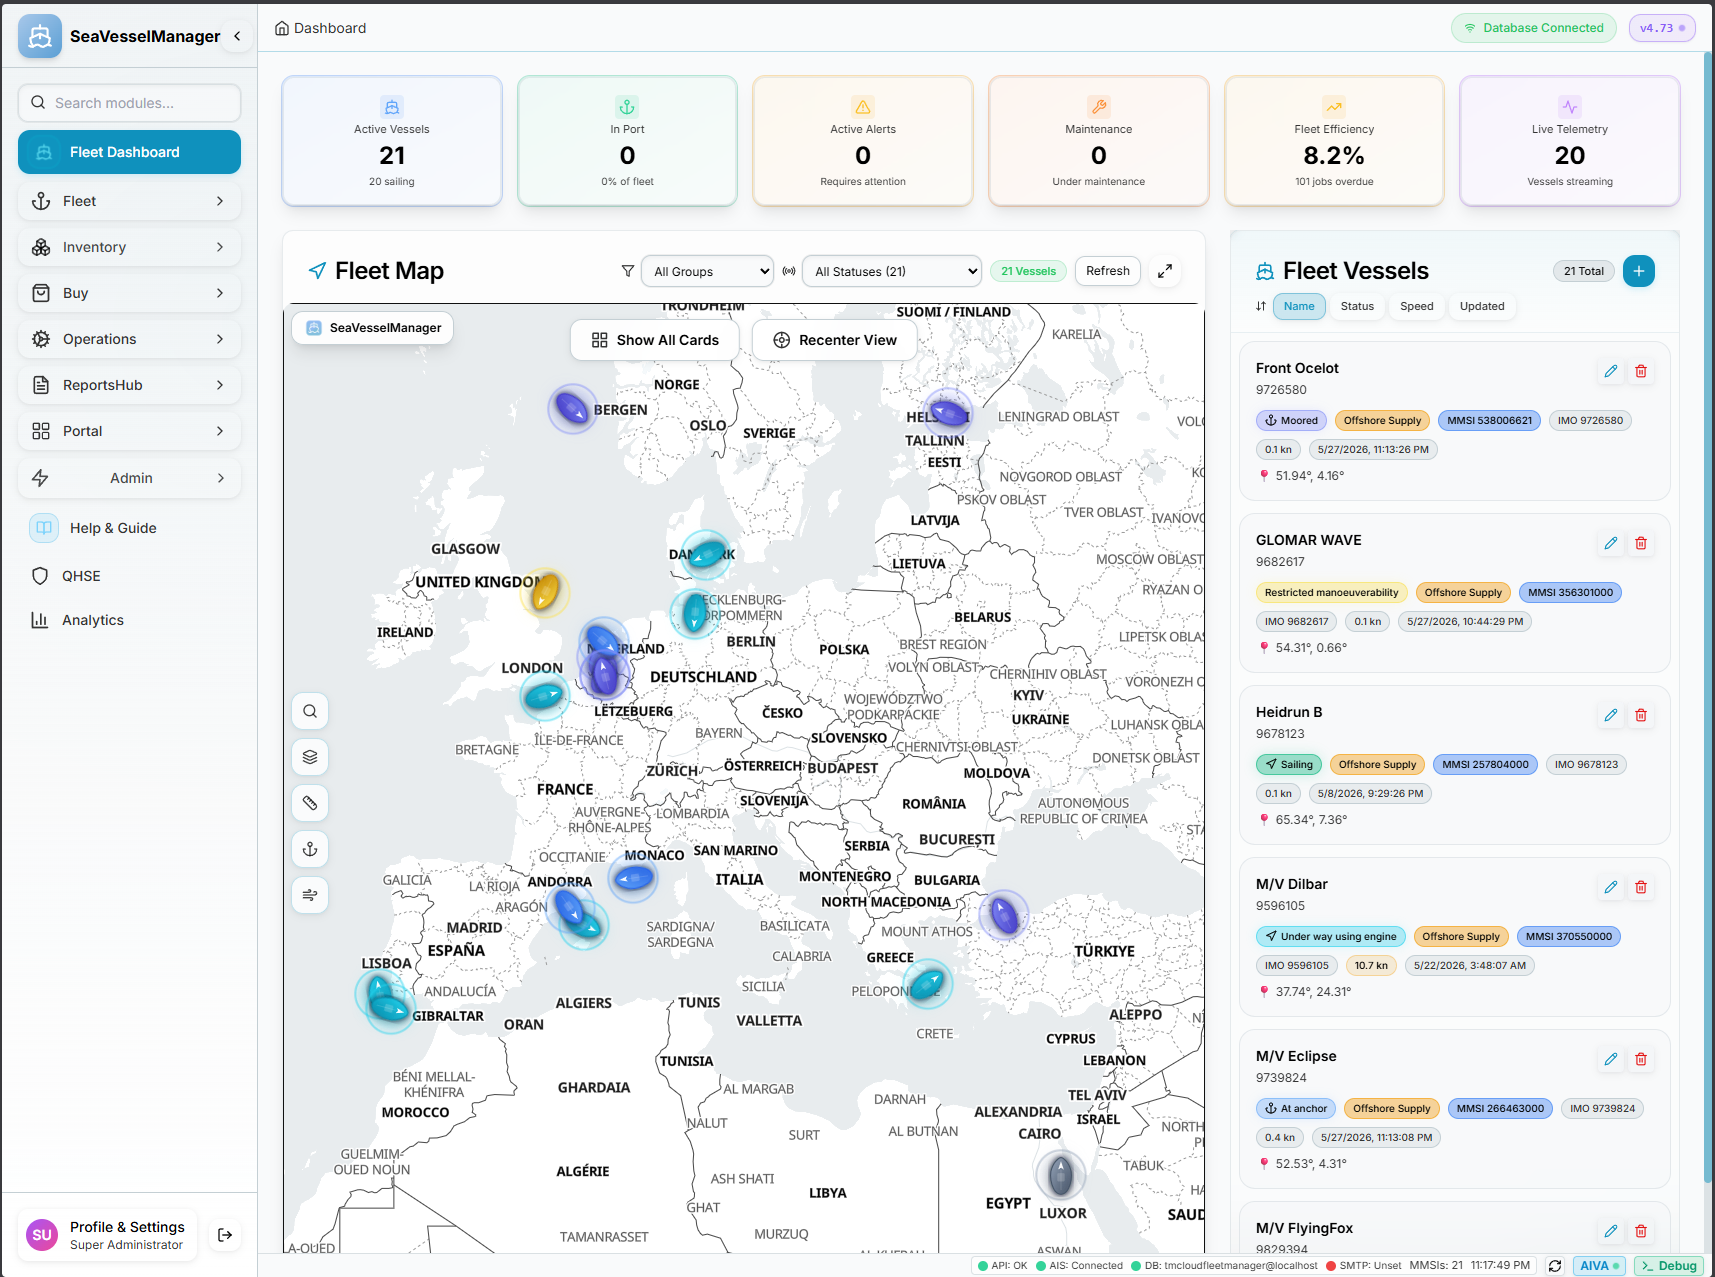
What gets installed
| Component | Port | What it does |
|---|---|---|
| PostgreSQL 17 | Internal | Database — stores all your data |
| Redis | Internal | Caching and real-time events |
| Backend API | 4001 | The REST API your app communicates with |
| Frontend | 3000 | The web application users open in a browser |
| Admin Panel | 8080 | Server status and QR-code onboarding |
Choose your platform
Step 0 — Request Access
📧 Request your access link
Fill in the short form and we will review your request and email your personal download link.
Direct URL: https://seavesselmanager.com/request-access
Submit the request form
The form at seavesselmanager.com/request-access asks for:
| Field | Why we ask |
|---|---|
| Full name | Who the licence is issued to |
| Company | Owner / manager / yard the installation belongs to |
| Work email | Where the personal download link is sent — use a company address, not a free webmail one |
| Fleet size | Number of vessels, so we can tell you whether Community Edition (up to 4 vessels) is enough |
| Intended use | Evaluation, on-board vessel install, office/shore install, or cloud deployment |
We review your request
A person reviews every submission — usually within one business day (longer over weekends and public holidays). Community Edition licence keys are only issued after this review.
Your personal download link arrives by email
On approval you receive an email containing a download link that is unique to you, of the form:
https://seavesselmanager.com/access/download.php?t=<TOKEN>| Property | Value |
|---|---|
| Validity | 7 days from the moment it is issued |
| Downloads allowed | Up to 3 times |
| Shareable? | No — the token is tied to your request. Do not forward it. |
| Expired or used up? | Email support@seavesselmanager.com and we reissue it |
seavesselmanager.com, then contact support@seavesselmanager.com.Download and extract the package
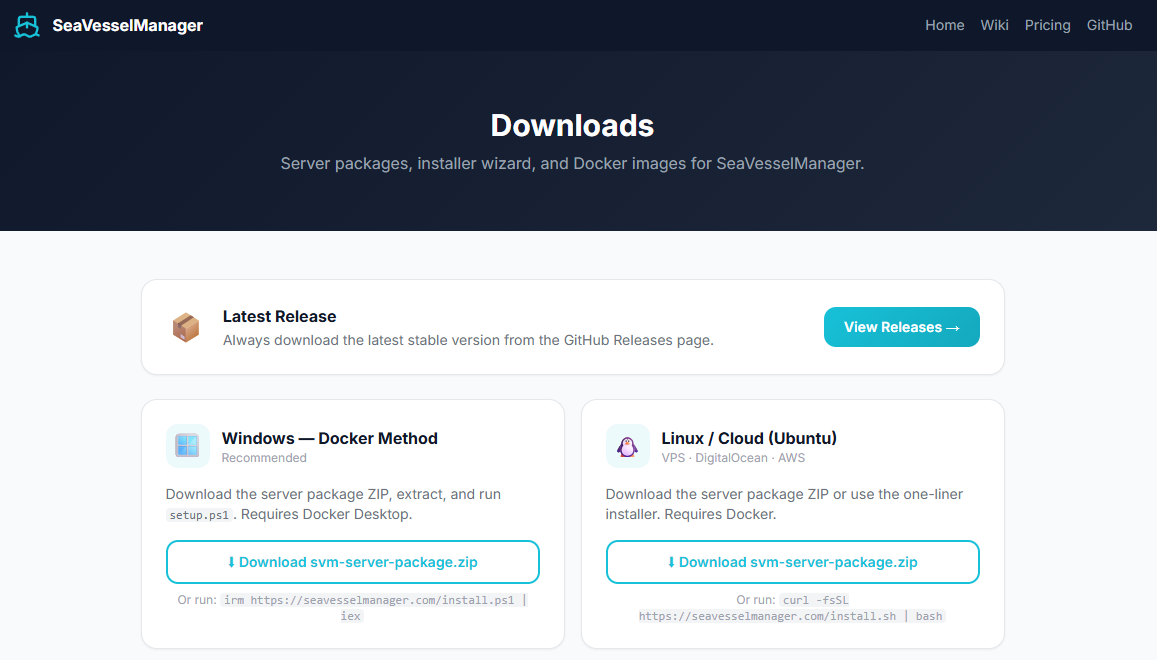
Open your personal link in a browser (or fetch it with curl on a headless server) and save svm-server-package-<version>.zip. Extract it to the folder you want the server to live in.
| Platform | Recommended location |
|---|---|
| Windows | C:\SVM\Server |
| macOS / Linux | /opt/seavesselmanager |
Run the bundled setup wizard
The ZIP contains the setup wizard — there is nothing else to download.
Windows (PowerShell, from inside the extracted folder):
powershell -ExecutionPolicy Bypass -File setup.ps1macOS / Linux (from inside the extracted folder):
chmod +x setup.sh && ./setup.shContinue to the platform guide for the full walkthrough: Windows · macOS · Linux / VPS.
What the wizard asks you
| Prompt | Default / what to enter |
|---|---|
| Server LAN IP | Auto-detected — press Enter to accept |
| API port | 4001 |
| Frontend port | 3000 |
| Admin port | 8080 |
| Deployment mode | vessel (on board), office (shore) or cloud (VPS) |
| Server name | A recognisable name, e.g. Office Server |
| Vessel name | The vessel this install belongs to, e.g. MV Arctic Star |
| Cloud sync URL | Optional — leave blank unless you are pairing a vessel with an office server |
The wizard then generates all secrets, writes the .env file, and starts the Docker containers for you.
Licensing at a glance
30-day grace period
Runs fully featured for 30 days with no licence key at all.
Community Edition
Free key for up to 4 vessels, never expires. Issued by support after your access review.
See Activate the Community Edition licence for the activation steps.
Before You Start
System requirements
| Requirement | Minimum | Notes |
|---|---|---|
| Docker Desktop | Version 24+ | Free for personal & small team use. Engine must be running. |
| RAM | 2 GB free | 4 GB recommended |
| Disk | 5 GB free | Docker images + database |
| Ports | 3000, 4001, 8080 | Must be free on host machine |
- Go to docker.com/products/docker-desktop
- Click Download for Windows and run the installer
- Launch Docker Desktop from the Start menu
- Wait for the whale icon to show "Engine running"
- Verify:
docker --version
- Go to docker.com/products/docker-desktop
- Download for Apple Silicon (M1/M2/M3/M4) or Intel
- Open the
.dmgand drag Docker to Applications - Launch Docker and wait for the whale icon in the menu bar to stop animating
curl -fsSL https://get.docker.com | sh
sudo usermod -aG docker $USER
newgrp dockerVerify: docker --version and docker compose version
Install on Windows
YOUR_TOKEN in the commands below with the token from your email link.Open PowerShell as Administrator
Press Win + X and choose Terminal (Admin) or Windows PowerShell (Admin).
Download your personal package and extract it
You can click the link in your email and unzip it with File Explorer, or do it all from PowerShell:
New-Item -ItemType Directory -Force -Path C:\SVM\Server | Out-Null
Set-Location C:\SVM\Server
# Paste the token from your personal email link
Invoke-WebRequest -Uri "https://seavesselmanager.com/access/download.php?t=YOUR_TOKEN" -OutFile pkg.zip
Expand-Archive -Path pkg.zip -DestinationPath . -Force
Move-Item .\svm-server-package\* . -Force
Remove-Item .\svm-server-package, .\pkg.zip -Recurse -ForceVerifying access token...
✓ Token valid · 2 of 3 downloads remaining
svm-server-package-v4.84.zip ████████████████████ 100% 18 MB
PS C:\SVM\Server> Expand-Archive -Path pkg.zip -DestinationPath . -Force
✓ Extracted to C:\SVM\Server
Run the bundled setup wizard
From inside the extracted folder, run setup.ps1:
cd C:\SVM\Server
powershell -ExecutionPolicy Bypass -File setup.ps1⚓ SeaVesselManager Setup
✓ Docker Desktop detected · Engine running
Detecting LAN IP...
✓ 192.168.1.100
Starting setup wizard...
-ExecutionPolicy Bypass is needed because the script is not signed for your machine. It only applies to this one run and does not change your system policy.Answer the setup questions
Press Enter to accept all defaults, or type a custom value:
Server LAN IP [auto-detected: 192.168.1.100]: ▮
API port [4001]: ▮
Frontend port [3000]: ▮
Admin port [8080]: ▮
Deployment mode (vessel/office/cloud) [vessel]: vessel
Server name [SeaVesselManager]: Bridge Server
Vessel name: MV Arctic Star
Cloud sync URL (optional, Enter to skip): ▮
✓ Secrets generated
✓ Configuration saved to .env
Starting containers...
| Question | What to enter |
|---|---|
| Server LAN IP | Press Enter — auto-detected |
| API port | Press Enter for 4001 |
| Frontend port | Press Enter for 3000 |
| Admin port | Press Enter for 8080 |
| Deployment mode | vessel (on-board), office (shore) or cloud (VPS) |
| Server name | A recognisable name, e.g. Bridge Server |
| Vessel name | The vessel this install belongs to, e.g. MV Arctic Star |
| Cloud sync URL | Optional — only when pairing a vessel install with an office server |
.env. You never have to invent or type credentials.Wait for Docker to pull images
First run downloads ~500 MB of Docker images. Takes 3–5 minutes.
17-alpine: ███████████████▒▒▒ 78% 89.2MB/112MB
Pulling sin92gh/seavesselmanager-backend:latest...
latest: ███████████████████▒ 95% 287MB/302MB
Pulling sin92gh/seavesselmanager-frontend:latest...
latest: ███▒▒▒▒▒▒▒▒▒▒▒▒▒▒▒▒▒ 18% 22MB/124MB
This may take a few minutes...
Open the web app
When setup completes, open your browser and go to http://localhost:3000
Log in with superadmin / superadmin. Change the password immediately — see First Login & Admin Password.
Managing the server
cd C:\SVM\Server

docker ps                                    # check all 5 containers are running
docker compose up -d                         # start
docker compose down                          # stop
docker logs svm-server-backend --tail 50     # view backend logs
Updating to a new version
SeaVesselManager ships new versions through Docker Hub. The customer package pins a specific version in docker-compose.yml, so docker compose pull on its own keeps re-pulling that same version. Bump the pinned tag first:
cd C:\SVM\Server
# 1. Back up, then bump the pinned image tags (PowerShell)
Copy-Item docker-compose.yml docker-compose.yml.bak
(Get-Content docker-compose.yml) -replace ':v4\.84',':v4.85' -replace 'APP_VERSION=v?4\.84','APP_VERSION=4.85' | Set-Content docker-compose.yml
# 2. Confirm the new tags
Select-String -Path docker-compose.yml -Pattern 'image:|APP_VERSION'
# 3. Pull the new images and recreate
docker compose pull
docker compose up -d --force-recreate backend frontend
docker compose logs -f backend
# Watch for: "Nest application successfully started", then Ctrl+CInstall on macOS
YOUR_TOKEN below with the token from your email link.Open Terminal
Press Cmd + Space, type Terminal, press Enter.
Download your personal package and extract it
Paste the token from your email link in place of YOUR_TOKEN:
sudo mkdir -p /opt/seavesselmanager && sudo chown $(whoami) /opt/seavesselmanager
cd /opt/seavesselmanager
curl -fsSL -o pkg.zip "https://seavesselmanager.com/access/download.php?t=YOUR_TOKEN"
unzip pkg.zip && mv svm-server-package/* . && rm -rf svm-server-package pkg.zipVerifying access token...
✓ Token valid · 2 of 3 downloads remaining
svm-server-package-v4.84.zip ████████████████████ 100% 18 MB
/opt/seavesselmanager $ unzip pkg.zip
✓ Extracted to /opt/seavesselmanager
Run the bundled setup wizard
From inside the extracted folder:
cd /opt/seavesselmanager
chmod +x setup.sh && ./setup.sh⚓ SeaVesselManager Setup
✓ Docker Engine detected (version 27.2)
Server LAN IP [auto: 192.168.0.45]: ▮
API port [4001]: ▮
Frontend port [3000]: ▮
Admin port [8080]: ▮
Deployment mode (vessel/office/cloud) [vessel]: office
Server name [SeaVesselManager]: Office Server
Vessel name: MV Arctic Star
Cloud sync URL (optional, Enter to skip): ▮
✓ Secrets generated · .env written
✓ Docker containers started
🚀 Open http://localhost:3000 to get started
Open the web app
Open Safari or Chrome and go to http://localhost:3000
Log in with superadmin / superadmin, then change the password immediately — see First Login & Admin Password.
Managing the server
cd /opt/seavesselmanager
docker ps
docker compose up -d
docker compose down
docker logs svm-server-backend --tail 50
Updating to a new version
SeaVesselManager ships new versions through Docker Hub. To update an existing install:
:v4.84) in docker-compose.yml, so docker compose pull alone keeps re-pulling that same old version. Bump the pinned tag first.cd /opt/seavesselmanager # or wherever docker-compose.yml lives
# 1. Back up, then bump the pinned image tags to the new version
cp docker-compose.yml docker-compose.yml.bak
sed -i 's/:v4\.84/:v4.85/g; s/APP_VERSION=v\?4\.84/APP_VERSION=4.85/g' docker-compose.yml
# 2. Confirm the new tags
grep -nE 'image:|APP_VERSION' docker-compose.yml
# 3. Pull the new images and recreate
docker compose pull
docker compose up -d --force-recreate backend frontend
docker compose logs -f backend
# Watch for: "Nest application successfully started", then Ctrl+CTip: swap v4.84/v4.85 for your current and target versions. To always track the newest build, set the tags to :latest and just run docker compose pull && docker compose up -d.
Install on Linux / VPS
YOUR_TOKEN below with the token from your email link.Install Docker (skip if already installed)
curl -fsSL https://get.docker.com | sh
sudo usermod -aG docker $USER
newgrp dockerDownload your personal package and run the setup wizard
Paste the token from your email link in place of YOUR_TOKEN. The whole install is these five lines:
mkdir -p /opt/seavesselmanager && cd /opt/seavesselmanager
curl -fsSL -o pkg.zip "https://seavesselmanager.com/access/download.php?t=YOUR_TOKEN"
unzip pkg.zip && mv svm-server-package/* . && rm -rf svm-server-package pkg.zip
chmod +x setup.sh && ./setup.shVerifying access token...
✓ Token valid · 2 of 3 downloads remaining
svm-server-package-v4.84.zip ████████████████████ 100% 18 MB
root@vps-01:/opt/seavesselmanager# ./setup.sh
⚓ SeaVesselManager Setup
✓ Docker Engine 27.2 detected
✓ Docker Compose 2.29 detected
Server public IP [auto: 45.92.11.55]: ▮
API port [4001]: ▮
Frontend port [3000]: ▮
Admin port [8080]: ▮
Deployment mode (vessel/office/cloud) [cloud]: ▮
Server name [SeaVesselManager]: Cloud Server
Vessel name: MV Arctic Star
Cloud sync URL (optional, Enter to skip): ▮
✓ Secrets generated · .env written
✓ Containers started. All 5 healthy.
🚀 http://45.92.11.55:3000
unzip is not installed on every minimal image. If you get unzip: command not found, run sudo apt-get update && sudo apt-get install -y unzip first.Open firewall ports
If you are using a cloud VPS (Hetzner, DigitalOcean, AWS, etc.), open ports 3000, 4001, and 8080 in the cloud firewall dashboard first. That's what actually controls traffic.
If you also have a local firewall (ufw) on the server:
sudo ufw allow 3000/tcp
sudo ufw allow 4001/tcp
sudo ufw allow 8080/tcpufw installed. If you get ufw: command not found, just skip it — the cloud firewall is what matters.Access the web app
http://<YOUR_SERVER_IP>:3000Log in with superadmin / superadmin. Change the password immediately — see First Login & Admin Password. Then activate your Community Edition licence within the 30-day grace period.
Managing the server
cd /opt/seavesselmanager
docker ps
docker compose up -d
docker compose down
docker logs svm-server-backend --tail 50
Updating to a new version
SeaVesselManager ships new versions through Docker Hub. To update an existing install:
:v4.84) in docker-compose.yml, so docker compose pull alone keeps re-pulling that same old version. Bump the pinned tag first.cd /opt/seavesselmanager # or wherever docker-compose.yml lives
# 1. Back up, then bump the pinned image tags to the new version
cp docker-compose.yml docker-compose.yml.bak
sed -i 's/:v4\.84/:v4.85/g; s/APP_VERSION=v\?4\.84/APP_VERSION=4.85/g' docker-compose.yml
# 2. Confirm the new tags
grep -nE 'image:|APP_VERSION' docker-compose.yml
# 3. Pull the new images and recreate
docker compose pull
docker compose up -d --force-recreate backend frontend
docker compose logs -f backend
# Watch for: "Nest application successfully started", then Ctrl+CTip: swap v4.84/v4.85 for your current and target versions. To always track the newest build, set the tags to :latest and just run docker compose pull && docker compose up -d.
Connect a Domain & Enable HTTPS
By default the app runs over plain HTTP on port 3000. To serve it on your own
domain with a valid certificate (e.g. https://fleet.yourcompany.com),
SeaVesselManager ships a built-in Caddy reverse proxy that obtains
and auto-renews a free Let's Encrypt certificate — no NGINX or Certbot needed.
Point your domain at the server
In your registrar's DNS settings, add an A-record pointing at the server's public IP:
| Type | Host / Name | Value |
|---|---|---|
| A | @ (root) | your.server.ip |
Example (STRATO): Domains → DNS → A-Record → manage, set host @ to your server IP, then save. GoDaddy, Namecheap and Cloudflare are similar.
nslookup yourdomain.com — it should return your server IP before you continue.Open ports 80 and 443 in your cloud firewall
Caddy needs port 80 (certificate challenge) and 443 (HTTPS) reachable from the internet.
- Hetzner / DigitalOcean / AWS / GCP: Open ports 80 and 443 in the cloud firewall (web console), not just on the server itself.
- If you also run ufw on the server:
sudo ufw allow 80/tcp && sudo ufw allow 443/tcp
Enable HTTPS
Option A — during setup: when you run the installer, enter your domain at the "Public domain for HTTPS" prompt. The setup script handles everything automatically.
Option B — manually on an existing install:
cd /opt/seavesselmanager/reverse-proxy # Linux
# C:\SVM\Server\reverse-proxy # Windows PowerShellNow create the Caddy .env file. Important: the file must start with SITE_ADDRESS= followed by just the domain name. No https://, no trailing slash.
echo "https://donto.space/" > .envRight:
echo "SITE_ADDRESS=donto.space" > .env# Linux / macOS
echo "SITE_ADDRESS=yourdomain.com" > .env
# Windows PowerShell
"SITE_ADDRESS=yourdomain.com" | Set-Content -Path .env -Encoding UTF8The Caddy config automatically rewrites /license/* to /api/v1/license/* so license activation works through the HTTPS proxy. This is handled automatically — no extra steps needed.
Start Caddy:
docker compose -f docker-compose.caddy.yml up -d
docker logs -f svm-server-caddyWatch the logs. Within 30–60 seconds you should see:
✓ certificate obtained successfully
https://yourdomain.com is live
required variable SITE_ADDRESS is missing a value, you wrote the .env file incorrectly. Delete it and recreate with the exact format shown above.Lock down the raw ports (required)
After HTTPS works, block direct access to the raw IP and ports. Otherwise http://YOUR_IP:3000 still works and bypasses your certificate.
Caddy reaches the containers through an internal Docker network, so you can safely bind the ports to 127.0.0.1 (localhost) only.
Linux / macOS:
sed on YAML files. sed is a text replacer, not a YAML parser. It corrupts indentation and quotes, producing errors like services.frontend.ports must be a array. Use Python (shown below) which understands the file structure.cd /opt/seavesselmanager
python3 << 'PYEOF'
import yaml
with open("docker-compose.yml") as f:
data = yaml.safe_load(f)
data["services"]["frontend"]["ports"] = ["127.0.0.1:${FRONTEND_PORT:-3000}:3000"]
data["services"]["backend"]["ports"] = ["127.0.0.1:${API_PORT:-4001}:4001"]
with open("docker-compose.yml", "w") as f:
yaml.dump(data, f, default_flow_style=False, sort_keys=False)
print("Done. Ports bound to localhost only.")
PYEOF
# Apply (postgres/redis untouched, data stays intact)
docker compose up -d
# Verify - backend/frontend should now show 127.0.0.1:... not 0.0.0.0:
docker ps --format "table {{.Names}}\t{{.Ports}}"Windows:
cd C:\SVM\Server
# 1. Open docker-compose.yml in Notepad
notepad docker-compose.yml
# 2. Find these two lines and add 127.0.0.1: in front:
# Before: - "${API_PORT:-4001}:4001"
# After: - "127.0.0.1:${API_PORT:-4001}:4001"
#
# Before: - "${FRONTEND_PORT:-3000}:3000"
# After: - "127.0.0.1:${FRONTEND_PORT:-3000}:3000"
# 3. Save and restart
docker compose up -d
# 4. Verify
docker ps --format "table {{.Names}}\t{{.Ports}}"https://yourdomain.com. The raw IP on port 3000 will refuse connections.Test everything
| Test | Expected result |
|---|---|
Open https://yourdomain.com | Login page loads, padlock icon in browser |
Open http://YOUR_IP:3000 | Connection refused (port is localhost-only) |
Open https://yourdomain.com/api/v1/health | JSON response with "status":"ok" |
Open https://yourdomain.com/license/status | JSON response with "mode":"licensed" (or "trial") |
Common mistakes
echo "https://donto.space/" > .envFix: Must include
SITE_ADDRESS= and no protocol or slash: SITE_ADDRESS=donto.spaceFix: Caddy needs ports 80 and 443. Port 80 is used for the Let's Encrypt challenge even though all traffic goes to 443.
Fix: Add
127.0.0.1: prefix in docker-compose.yml so http://IP:3000 no longer works.Fix: Run
nslookup yourdomain.com on your local machine. If it doesn't return your server IP, wait and try again.Fix: The built-in Caddy config handles this automatically. If you use your own NGINX, add
location /license/ { proxy_pass http://127.0.0.1:4001/api/v1/license/; } so the /license/* path reaches the backend.Troubleshooting
- Cert request hangs or fails — DNS not propagated yet, or port 80 blocked. Check
nslookupand the firewall, thendocker compose -f docker-compose.caddy.yml restart. - Browser still shows insecure / old page — hard-refresh (Ctrl/Cmd+Shift+R) to clear the cached service worker.
SITE_ADDRESS is missing a value— You forgotSITE_ADDRESS=in the.envfile. Delete and recreate it exactly as shown in Step 3.
If you prefer your own NGINX, proxy the domain to the frontend and API (skip the built-in Caddy):
sudo apt-get install -y nginx certbot python3-certbot-nginxserver {
listen 80;
server_name yourdomain.com;
location /api/ { proxy_pass http://127.0.0.1:4001; client_max_body_size 50M; }
location /socket.io/ { proxy_pass http://127.0.0.1:4001; proxy_http_version 1.1; proxy_set_header Upgrade $http_upgrade; proxy_set_header Connection 'upgrade'; }
location /license/ { proxy_pass http://127.0.0.1:4001/api/v1/license/; }
location / { proxy_pass http://127.0.0.1:3000; proxy_set_header Host $host; }
}
sudo ln -s /etc/nginx/sites-available/seavesselmanager /etc/nginx/sites-enabled/
sudo nginx -t && sudo systemctl reload nginx
sudo certbot --nginx -d yourdomain.com
Desktop Client
What is the Desktop Client?
The SeaVesselManager Desktop Client is a native Tauri 2 application that wraps the full web interface in a native window. It connects to any running SeaVesselManager server on your LAN or internet — no browser, no Docker, no installation of any server components on the client machine.
Windows
Windows 10 / 11.exe installer — ~35 MB
macOS
Intel + Apple Silicon (universal).dmg — ~40 MB
No Docker required
Docker only needs to run on the server machine, not on every crew member’s laptop.
Connects to any server
LAN address, domain name, or VPN — any reachable SeaVesselManager server works.
How it will work
Download & install
Run the .exe (Windows) or open the .dmg (macOS). No admin rights or Docker needed on the client.
Enter your server URL
Enter the API address of your server, e.g. http://192.168.1.100:4001/api/v1. You can also scan the QR code from the Admin Panel at :8080.
Log in with your account
Use your normal SeaVesselManager username and password. The session is stored securely on your device.
Full access — native experience
The entire SeaVesselManager interface runs inside the app. All modules, work orders, spare parts, QHSE, and AIVA work exactly as in the browser version.
First Login & Admin Password
1. Open the app and sign in
| Where | Value |
|---|---|
| URL (same machine) | http://localhost:3000 |
| URL (other device on the LAN) | http://<SERVER_LAN_IP>:3000 |
| Username | superadmin |
| Password | superadmin — change it immediately |
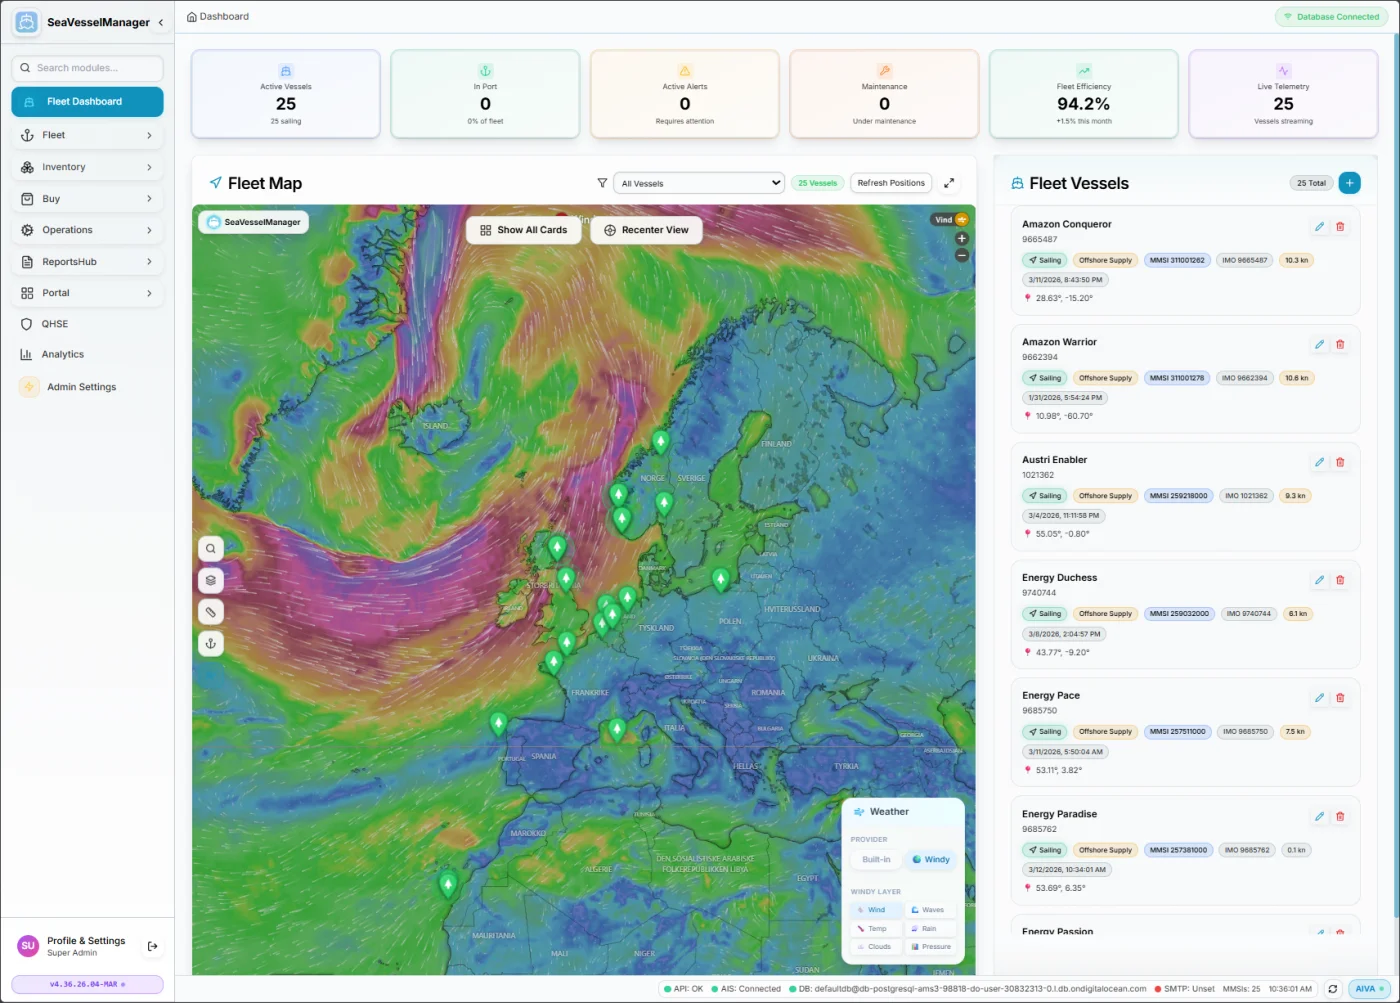
docker compose logs -f backend for Nest application successfully started.After signing in you land on the fleet dashboard:
2. Change the admin password — now
superadmin / superadmin credentials are public knowledge. Change the password before adding any real data, before opening any firewall port, and before creating other users.Set a strong password
Go to Settings → Profile and set a strong password (12+ characters, stored in your password manager — there is no self-service reset on an offline vessel install).
Create real user accounts
Go to Admin → Users → New User and give every person their own named account. Never share the superadmin login.
| Role | Access |
|---|---|
superadmin | Full system access, including licensing and server settings |
admin | Manage vessels, assets and data |
user | Day-to-day operations: work orders, running hours, stock |
Vessel-level access is granted per user, so a crew account can be restricted to a single vessel.
Set the basics in Settings
Confirm the company name, time zone, date format and units under Settings. Getting the time zone right first avoids confusing due-date maths in PM schedules later.
Continue with licensing and configuration
Next: activate the Community Edition licence, then work through the first-run configuration tour.
First-login checklist
| ✓ | Task |
|---|---|
| 1 | Change the superadmin password |
| 2 | Create named accounts for each user, assign roles and vessel access |
| 3 | Set company name, time zone, date format, units |
| 4 | Activate the Community Edition licence key |
| 5 | Create your first vessel |
| 6 | Import assets, spare parts and PM schedules |
| 7 | Take your first backup and confirm it restores |
Activate the Community Edition Licence
What Community Edition includes
| Property | Community Edition |
|---|---|
| Price | Free |
| Vessels | Up to 4 |
| Expiry | Never expires |
| Modules | Full PMS: assets, work orders, spare parts, certificates, QHSE, crew, reports, AIVA |
| How to get it | Issued by support after your access request has been reviewed |
| More than 4 vessels? | Contact support@seavesselmanager.com about a fleet licence |
Activation steps
Ask support for your key
If it was not included in your approval email, reply to it or write to support@seavesselmanager.com. Include your server name and machine/installation ID from Settings → License.
Open Settings → License
Sign in as superadmin. The page shows your current mode (trial or licensed) and days remaining.
Paste the key and activate
Paste the key exactly as sent — no spaces, no line breaks — and click Activate. The banner changes from the grace-period countdown to Community Edition · 4 vessels.
Verify from the command line
curl http://localhost:4001/api/v1/license/status{"mode":"licensed","edition":"community",
"maxVessels":4,"expiresAt":null}
✓ Community Edition active
/license/* to /api/v1/license/*. With your own NGINX, add that mapping — see Connect a Domain & Enable HTTPS.First-Run Configuration Tour
SeaVesselManager is a planned maintenance system, so the data has a natural order. Build it top-down: a vessel owns assets (equipment), assets consume spare parts, and PM schedules generate work orders against those assets.
1. Create your vessels
Go to Fleet → Add Vessel. Name, IMO number, flag state and type are the fields that matter for reporting and certificates.
2. Import your assets (equipment register)
Open Assets and either add items manually or use Import with the Excel template. Assets are hierarchical — Main Engine → Turbocharger → Bearing — so import parents before children, or let the template's parent-code column do it for you.
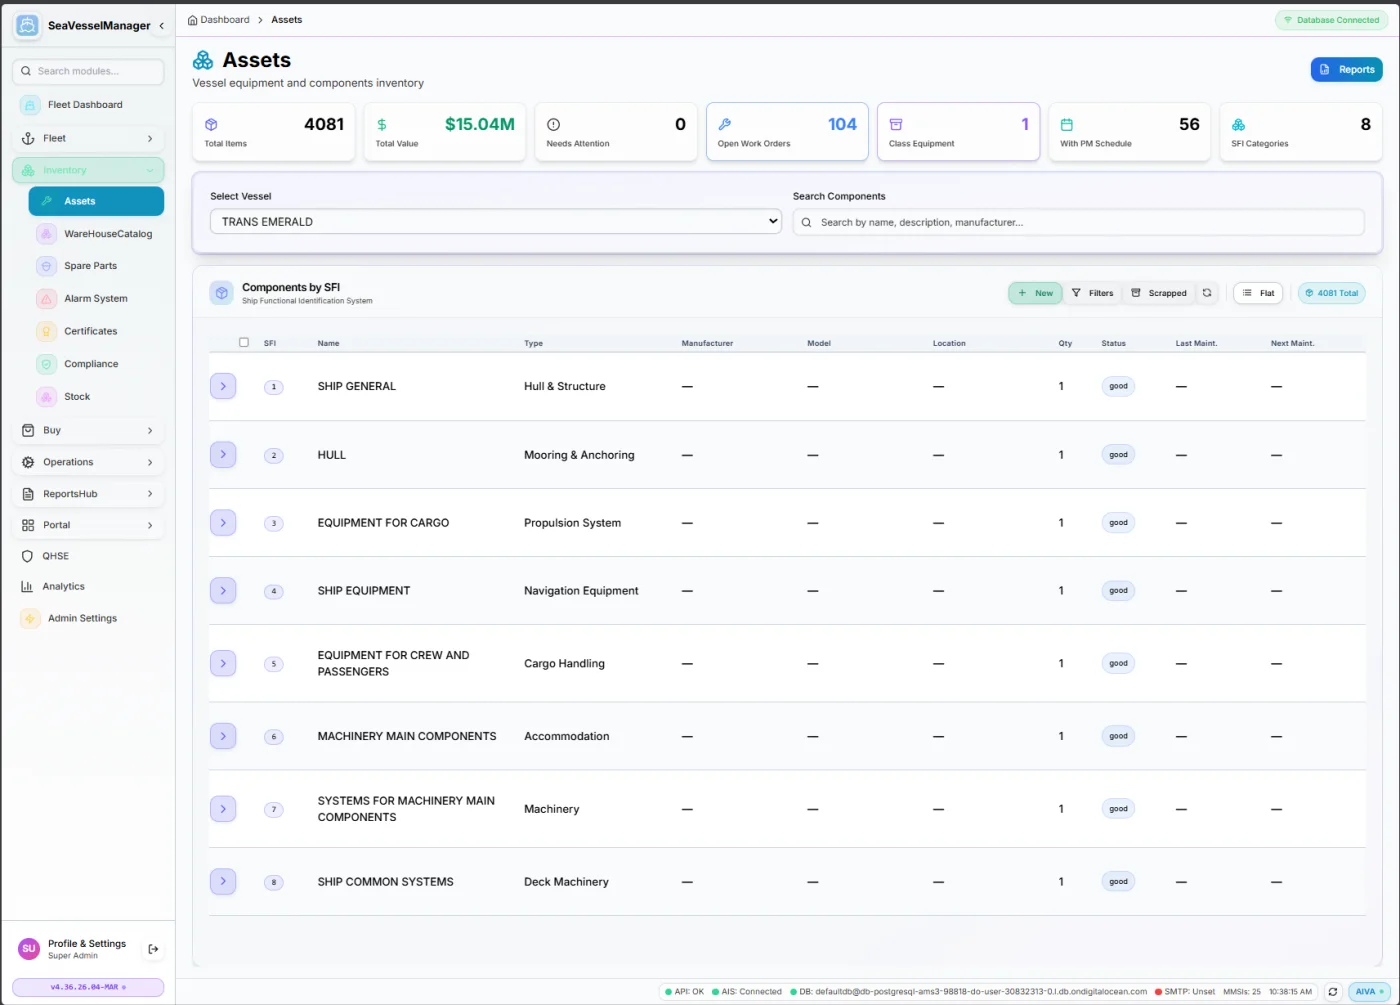
Open any asset to see its detail view: technical data, documents, linked spare parts, maintenance history and running hours.
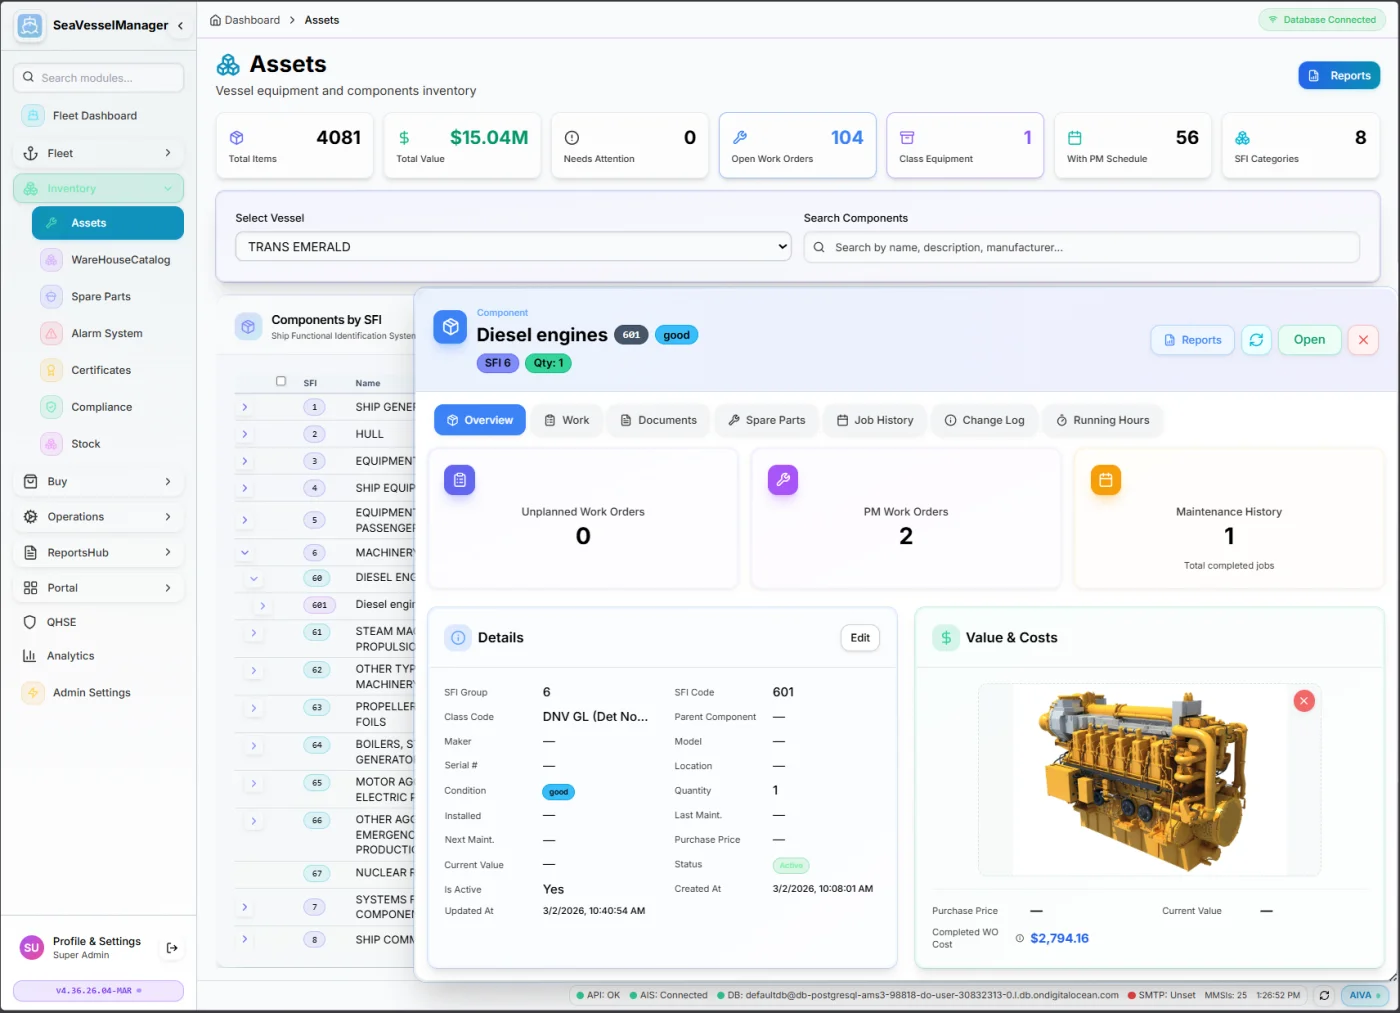
| Field | Why it matters |
|---|---|
| Asset code | Unique per vessel; used by imports and PM schedules to link records |
| Parent asset | Builds the hierarchy so you can roll costs and jobs up per system |
| Criticality | Drives alert priority and class/inspection reporting |
| Running hours | Starting counter for hour-based PM schedules |
3. Load spare parts and stock
Go to Spare Parts to create the catalogue, then Stock to set on-board quantities, minimum levels and locations. Link parts to assets so a work order can reserve exactly what it consumes.
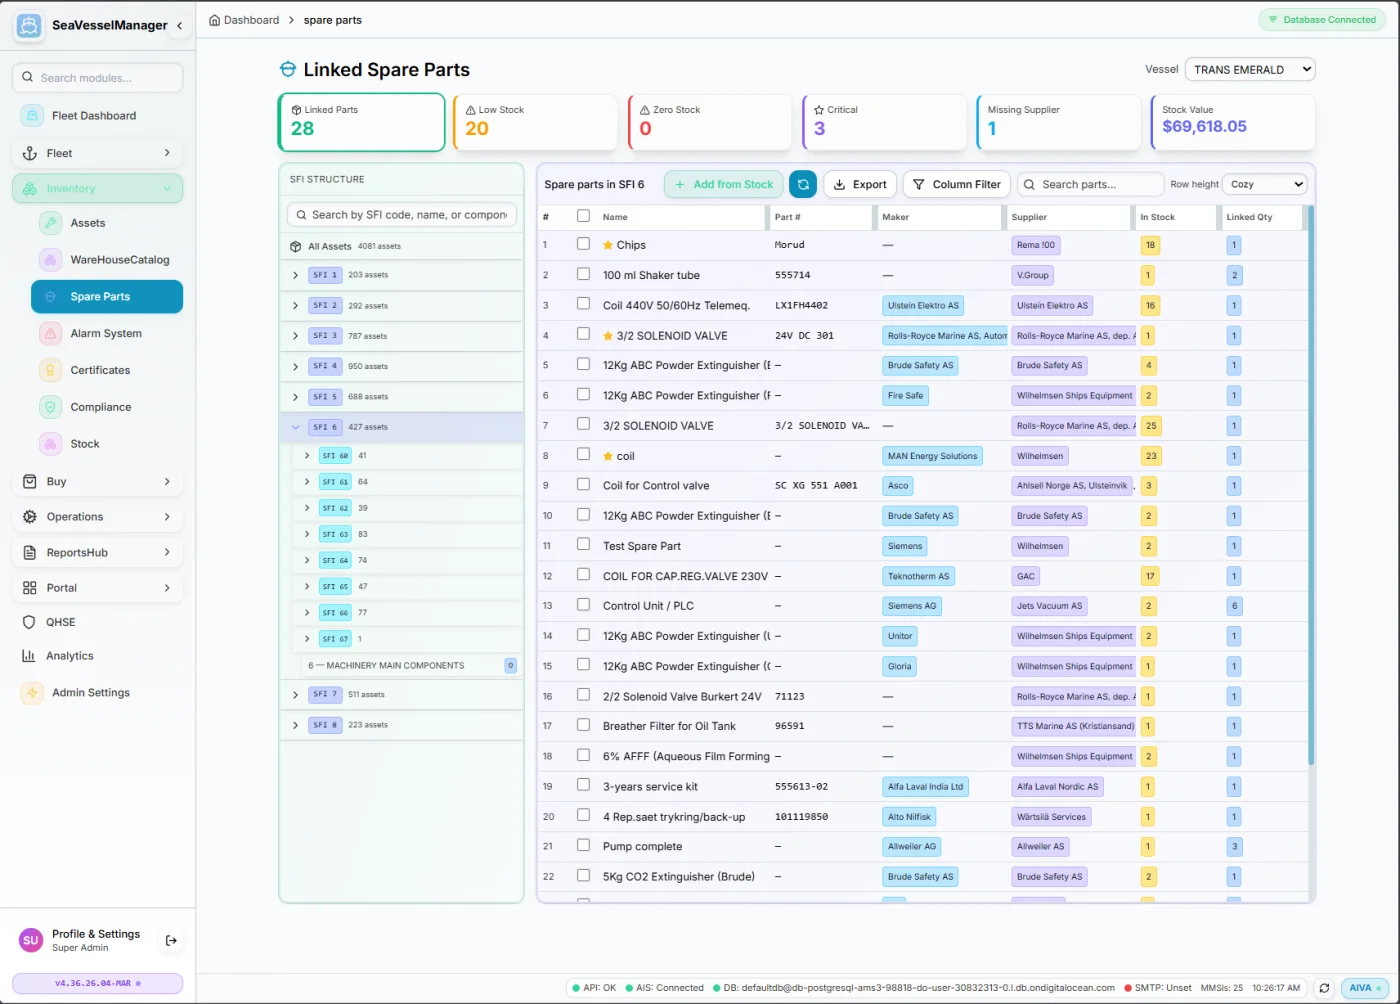
- Set a minimum stock level on critical parts — below it, the part appears in alerts and can be pulled straight into a purchase order.
- Record the storage location (store, rack, bin) so crew can actually find the part.
- Link parts to their asset — deleting an asset never deletes spare parts, it only unlinks them.
4. Build your PM schedules
Under Maintenance, create planned maintenance schedules per asset. Each schedule can be calendar-based (every 6 months), running-hours-based (every 500 h), or both — whichever falls due first. Work orders are generated automatically as due dates approach.
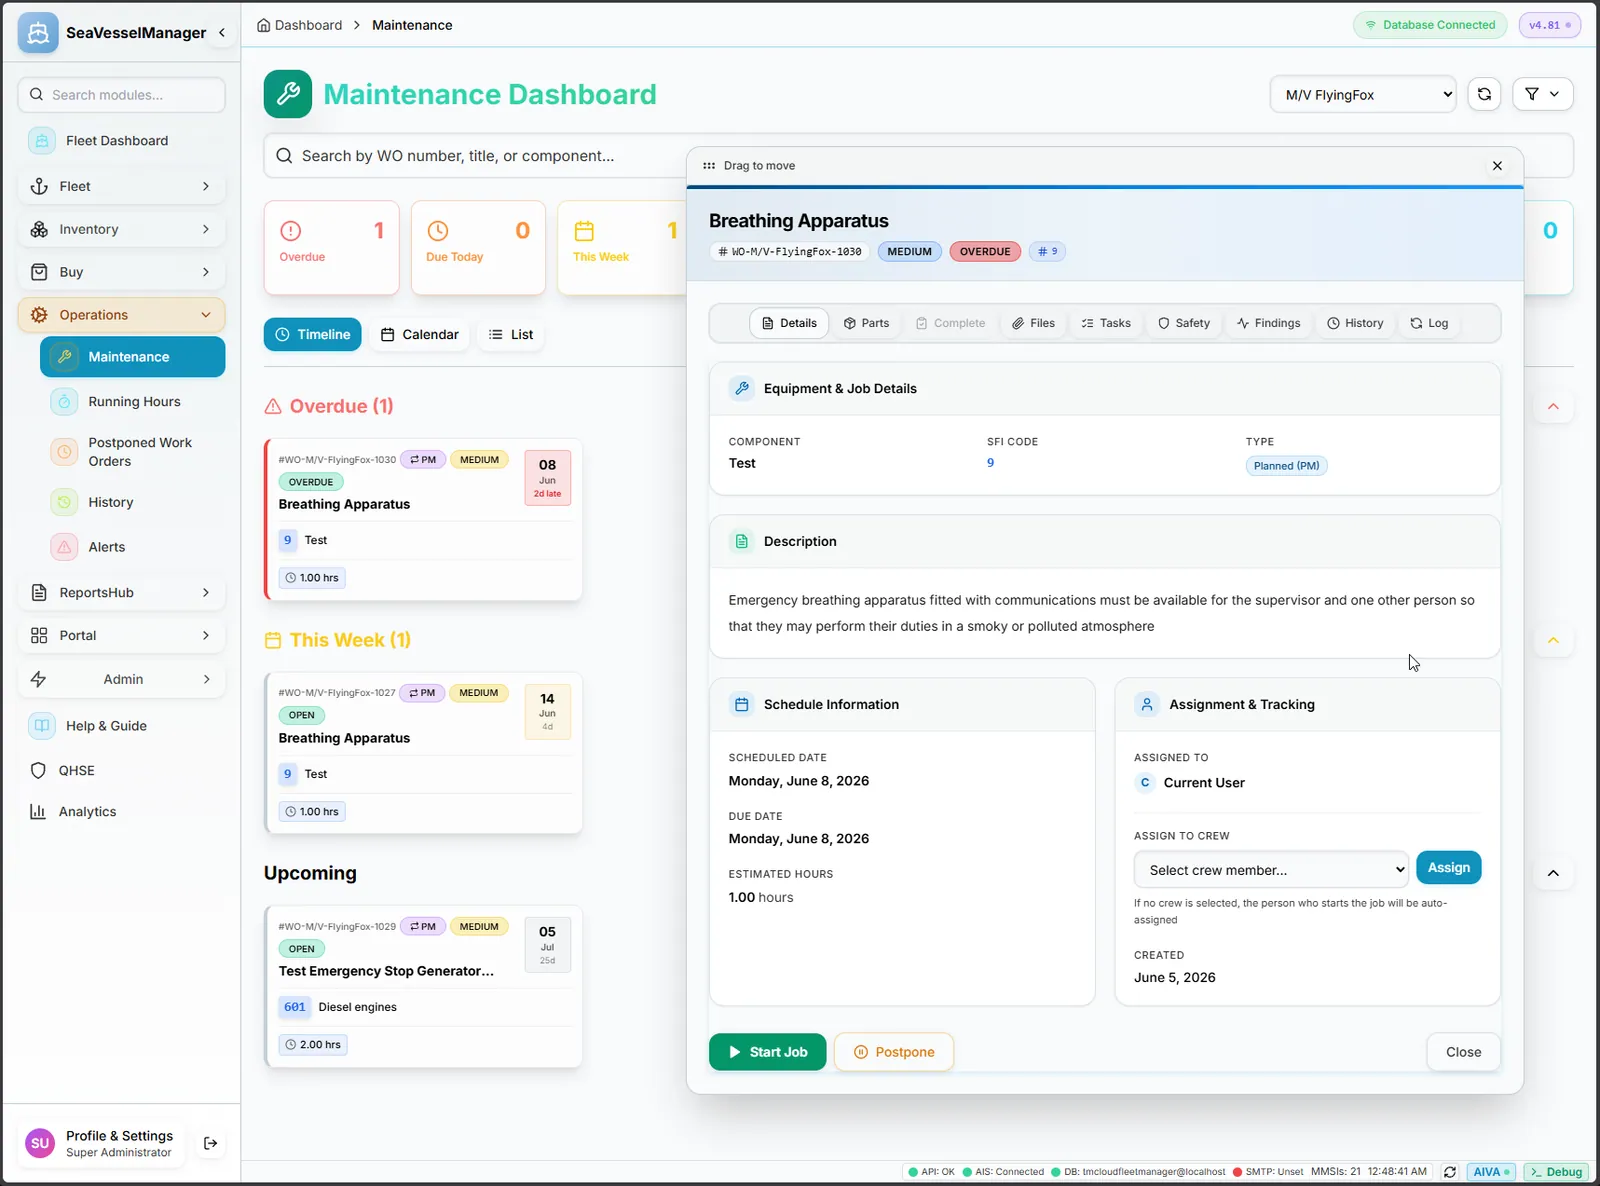
| Schedule setting | Notes |
|---|---|
| Interval type | Calendar, running hours, or both (first-due wins) |
| Last done | Set this at import so the first job is due at the right time, not immediately |
| Required spares | Attach the parts the job consumes — stock is decremented on completion |
| Instructions / checklist | What the engineer actually has to do, plus any attachments |
5. Meet AIVA, the built-in assistant
AIVA is the SeaVesselManager assistant. Ask it about overdue jobs, stock levels, or a specific asset's history in plain language instead of hunting through screens — useful while your team is still learning the module layout.
6. Then fill in the rest
| Module | What to set up |
|---|---|
| Certificates | Vessel and crew certificates with expiry dates — drives compliance alerts |
| Class Surveys | Survey windows and due dates for your classification society |
| Crew | Crew list, ranks, assignments and certificate matrix |
| QHSE | Non-conformities, incidents, inspections and audits |
| Procurement | Suppliers, requisitions and purchase orders fed from low stock |
| Documents | Manuals and drawings attached to vessels and assets |
Updating SeaVesselManager
docker compose logs -f backend until you see Nest application successfully started.The short version
docker compose pull
docker compose up -d --force-recreate backend frontendTake a backup before every update — see Backup & Restore. If your docker-compose.yml pins an explicit version tag, bump it first as shown below.
Windows
:v4.84) in docker-compose.yml, so docker compose pull alone keeps re-pulling that same old version. Bump the pinned tag first.cd C:\SVM\Server
# 1. Back up, then bump the pinned image tags (PowerShell)
Copy-Item docker-compose.yml docker-compose.yml.bak
(Get-Content docker-compose.yml) -replace ':v4\.84',':v4.85' -replace 'APP_VERSION=v?4\.84','APP_VERSION=4.85' | Set-Content docker-compose.yml
# 2. Confirm the new tags
Select-String -Path docker-compose.yml -Pattern 'image:|APP_VERSION'
# 3. Pull the new images and recreate
docker compose pull
docker compose up -d --force-recreate backend frontend
docker compose logs -f backend
# Watch for: "Nest application successfully started", then Ctrl+CmacOS / Linux
:v4.84) in docker-compose.yml, so docker compose pull alone keeps re-pulling that same old version. Bump the pinned tag first.cd /opt/seavesselmanager # or wherever docker-compose.yml lives
# 1. Back up, then bump the pinned image tags to the new version
cp docker-compose.yml docker-compose.yml.bak
sed -i 's/:v4\.84/:v4.85/g; s/APP_VERSION=v\?4\.84/APP_VERSION=4.85/g' docker-compose.yml
# 2. Confirm the new tags
grep -nE 'image:|APP_VERSION' docker-compose.yml
# 3. Pull the new images and recreate
docker compose pull
docker compose up -d --force-recreate backend frontend
docker compose logs -f backend
# Watch for: "Nest application successfully started", then Ctrl+CTip: swap v4.84/v4.85 for your current and target versions. To always track the newest build, set the tags to :latest and just run docker compose pull && docker compose up -d.
docker compose up -d --force-recreate after pulling — a plain docker compose restart does not pick up new images, and docker compose up -d alone may keep the old containers running if compose detects no config change.What each step does
| Command | What happens |
|---|---|
docker compose pull | Downloads the new backend and frontend images from Docker Hub |
docker compose up -d --force-recreate backend frontend | Stops the old containers and starts new ones from the pulled images. Postgres and Redis are skipped — your data is safe. |
docker compose logs -f backend | Streams the backend startup log so you can confirm it boots cleanly with no migration errors |
Verify the new version
curl http://localhost:4001/api/v1/healthThe response includes the running version number.
Backup & Restore
svm-server-postgres. The containers, images and even the extracted package folder are all disposable — the volume is not. Back it up on a schedule and copy it off the machine.What to back up
| Item | Why |
|---|---|
| Postgres database (logical dump) | Every vessel, asset, work order, spare part, certificate and audit record |
.env | Generated secrets, ports and deployment mode — without it a restore needs reconfiguring |
docker-compose.yml | Your pinned image versions and any port customisation |
| Uploads / documents volume | Attached manuals, drawings and photos |
Quick backup (bundled script)
The package ships helper scripts next to docker-compose.yml:
cd /opt/seavesselmanager
./backup.sh # writes a timestamped .sql.gz into ./backupsManual backup with pg_dump
macOS / Linux:
cd /opt/seavesselmanager
mkdir -p backups
# Logical dump of the whole database, gzipped
docker exec -t svm-server-postgres pg_dump -U svm -d seavesselmanager \
| gzip > backups/svm-backup-$(date +%Y%m%d-%H%M).sql.gz
# Keep the config alongside it
cp .env docker-compose.yml backups/
ls -lh backupsWindows (PowerShell):
cd C:\SVM\Server
New-Item -ItemType Directory -Force -Path .\backups | Out-Null
$stamp = Get-Date -Format 'yyyyMMdd-HHmm'
docker exec -t svm-server-postgres pg_dump -U svm -d seavesselmanager |
Set-Content -Encoding UTF8 ".\backups\svm-backup-$stamp.sql"
Copy-Item .env, docker-compose.yml .\backups\dumping schema and data...
✓ backups/svm-backup-20260501-0730.sql.gz (42 MB)
-U user and -d database name against your .env (DB_USER / DB_NAME) if the dump errors with role does not exist.Volume-level snapshot (alternative)
If you prefer a raw copy of the data directory instead of a logical dump, stop the stack first so the files are consistent:
cd /opt/seavesselmanager
docker compose stop
docker run --rm \
-v svm-server_postgres_data:/data \
-v "$(pwd)/backups":/backup \
alpine tar czf /backup/pg-volume-$(date +%Y%m%d).tar.gz -C /data .
docker compose start
docker volume ls # confirm the exact volume name if the command above failsRestore
Bundled script:
cd /opt/seavesselmanager
./restore.sh backups/svm-backup-20260501-0730.sql.gzManual restore from a gzipped dump:
cd /opt/seavesselmanager
# 1. Stop the app containers so nothing writes during the restore
docker compose stop backend frontend
# 2. Recreate an empty database
docker exec -i svm-server-postgres psql -U svm -d postgres \
-c "DROP DATABASE IF EXISTS seavesselmanager;" -c "CREATE DATABASE seavesselmanager;"
# 3. Load the dump
gunzip -c backups/svm-backup-20260501-0730.sql.gz \
| docker exec -i svm-server-postgres psql -U svm -d seavesselmanager
# 4. Bring the app back up (migrations run automatically on boot)
docker compose up -d backend frontend
docker compose logs -f backendSuggested routine
| When | Action |
|---|---|
| Daily | Automated pg_dump to local backups/ |
| Weekly | Copy the newest dump off the machine (office server, NAS, or cloud storage) |
| Before every update | Manual dump plus a copy of .env and docker-compose.yml |
| Quarterly | Restore into a test install to prove the backup works |
Troubleshooting
Symptom → cause → fix
| Symptom | Likely cause | Fix |
|---|---|---|
port is already allocated / bind: address already in use on 3000 | Something else (often a Node dev server) owns the frontend port | Stop it, or set FRONTEND_PORT=3001 in .env and run docker compose up -d |
| Same error on 4001 | Another API or an old SeaVesselManager backend still running | docker ps -a, remove the stale container, or set API_PORT in .env |
| Same error on 5432 | A local PostgreSQL install already owns the Postgres port | Stop the local service, or remove/remap the 5432 host mapping — the app talks to Postgres over the internal Docker network anyway |
| Same error on 8080 | Another admin panel / proxy on that port | Set ADMIN_PORT in .env and recreate |
Cannot connect to the Docker daemon / error during connect | Docker is installed but not running | Start Docker Desktop and wait for Engine running; on Linux sudo systemctl start docker |
| Setup fails part-way, images half-pulled | Low disk space | docker system df then docker system prune -f; keep 5+ GB free |
no space left on device | Docker volume/image cache is full | Free disk, then docker system prune -a (careful: removes unused images) |
A container keeps restarting (Restarting (1) in docker ps) | Crash loop — usually a bad .env value or Postgres not ready yet | docker compose logs --tail 100 backend and read the first error, not the last |
Backend restarts with JWT_SECRET or DB connection errors | .env was edited or lost its generated secrets | Restore .env from backup, or re-run the setup wizard |
relation "..." does not exist on login | Backend booted before migrations completed | docker restart svm-server-backend, then watch the logs |
| Login page loads but every request fails | Frontend cannot reach the API address in .env | Check SERVER_IP is the LAN IP, not 127.0.0.1, then recreate the frontend |
| Reachable on the server but not from other devices | Host firewall or cloud firewall closed | Open 3000/4001 (and 8080 if used) — cloud firewall dashboard first |
| UI shows a licence banner / restricted screens | 30-day grace period expired | Activate the Community Edition licence |
| Download link returns an error page | Link older than 7 days or 3 downloads used | Email support@seavesselmanager.com for a reissue |
Reading the logs
Nine out of ten problems are answered by the first error in the backend log. Run these from the folder that contains docker-compose.yml:
docker compose ps # state of every container (look for Restarting / Exited)
docker compose logs --tail 100 backend # last 100 lines from the API
docker compose logs -f backend # follow live, Ctrl+C to stop
docker compose logs --tail 50 postgres # database startup problems
docker compose logs --tail 50 frontend # web app build/runtime problems
docker compose logs --since 10m # everything from the last 10 minutes
docker stats --no-stream # CPU / RAM per containerNAME STATUS
svm-server-postgres Up 4 minutes (healthy)
svm-server-redis Up 4 minutes (healthy)
svm-server-backend Restarting (1) 8 seconds ago
svm-server-frontend Up 4 minutes
$ docker compose logs --tail 30 backend
Error: connect ECONNREFUSED 5432 — database not ready yet
Free a busy port
Windows (PowerShell):
Get-NetTCPConnection -LocalPort 3000 -State Listen |
Select-Object LocalPort, OwningProcess, @{n='Process';e={(Get-Process -Id $_.OwningProcess).ProcessName}}macOS / Linux:
sudo lsof -i :3000 -sTCP:LISTEN
# or
sudo ss -ltnp | grep -E ':(3000|4001|5432|8080)'Then either stop that process, or change the port in .env and recreate:
# .env
FRONTEND_PORT=3001
API_PORT=4002
ADMIN_PORT=8081docker compose up -d --force-recreateDetailed walkthroughs
- Run
docker ps— should show 5 containers - Try
http://localhost:3000first - Check firewall: ports 3000 and 4001 must be open
- View logs:
docker logs svm-server-frontend --tail 30
The database schema was not created yet. Restart the backend:
docker restart svm-server-backend- Make sure
SERVER_IPin.envis the machine's LAN IP, not127.0.0.1 - Windows: Allow inbound on ports 3000 and 4001 in Windows Defender Firewall
- Linux:
sudo ufw allow 3000/tcp
wsl --install
wsl --set-default-version 2
Then restart Docker Desktop.
docker compose down -v
docker compose up -dThe Docker engine is not running — installing it is not the same as starting it.
- Windows / macOS: launch Docker Desktop and wait for Engine running (whale icon steady).
- Linux:
sudo systemctl start docker && sudo systemctl enable docker - Linux permission denied:
sudo usermod -aG docker $USERthennewgrp docker.
Verify before retrying:
docker --version
docker compose version
docker info | head -20The images need roughly 500 MB to pull and the database grows over time. Keep at least 5 GB free.
docker system df # what Docker is using
docker image prune -f # remove dangling images (safe)
docker system prune -f # remove stopped containers + unused networksdocker system prune --volumes or docker compose down -v on a live install — both destroy the Postgres volume and therefore all your data.docker compose ps— identify which service showsRestarting.docker compose logs --tail 100 <service>— read the first error.- If it is the backend: usually Postgres was not ready, or
.envis missing a value. Confirm Postgres ishealthy, thendocker compose up -d --force-recreate backend. - If it is postgres: often a corrupted or half-initialised volume, or the host ran out of disk. Check the log for
PANIC/could not write. - If it is the frontend: check that
API_PORT/SERVER_IPin.envare sane, then recreate it.
docker compose ps
docker compose logs --tail 100 backend
docker compose up -d --force-recreate backendEmail support@seavesselmanager.com with the output of:
docker --version
docker compose version
docker compose ps
docker compose logs --tail 200 backend
curl -s http://localhost:4001/api/v1/health.env before sharing it. It contains generated database and JWT secrets. Never paste passwords, tokens or your download link into an email or a ticket.FAQ & Contact
Getting access
Distribution is by request only. The package is reviewed and released per requester so we know who is running it, can match you to the right licence, and can reach you about security updates. Request access at seavesselmanager.com/request-access.
Usually within one business day. A human reviews every request, so weekends and public holidays add delay. If nothing arrives, check spam then email support@seavesselmanager.com.
Links are valid for 7 days and 3 downloads. Email support@seavesselmanager.com from the same address you requested with and we will reissue it.
No — the token is tied to your request and burns one of your three downloads. Ask them to submit their own request instead.
You need the ZIP, not the link — keep a copy on your own storage. If you lost it, request a reissue.
Licensing
The install keeps all its data but the UI is restricted until a valid key is entered. Activating the free Community Edition key unlocks it again immediately — nothing is deleted.
Yes, free, and it never expires. The limit is up to 4 vessels. Larger fleets need a fleet licence — ask support@seavesselmanager.com.
Yes — contact support with the old and new installation IDs from Settings → License and we will reissue the key.
Running it
Yes. SeaVesselManager is offline-first: everything runs on the vessel's own server. Internet is only needed to pull images during install/update and, optionally, to sync with an office server.
In the PostgreSQL Docker volume on your machine. Nothing is sent anywhere unless you deliberately configure a cloud sync URL. See Backup & Restore.
No. Only the backend and frontend containers are replaced; Postgres and Redis are untouched. Migrations apply automatically on backend boot. Back up first anyway — see Updating.
Yes — either answer the wizard's port prompts, or edit FRONTEND_PORT, API_PORT and ADMIN_PORT in .env and run docker compose up -d --force-recreate.
Yes — the package ships a Caddy reverse proxy that obtains and renews a free certificate. See Connect a Domain & Enable HTTPS.
No. Docker only runs on the server. Everyone else uses a browser at http://<SERVER_IP>:3000, or the desktop thin client when it ships.
There is no self-service reset on an isolated install. Contact support@seavesselmanager.com — and keep the password in a password manager. Do not send us the password you think it might be.
Contact
Support
support@seavesselmanager.com
Installation, licensing and troubleshooting.
Request access
seavesselmanager.com/request-access
Start here for a new installation.
When you write in, include your version (from Settings or /api/v1/health), your platform, and the log output listed in Troubleshooting. Never include secrets from .env or your download token.
Quick Reference
Default login
| Field | Value |
|---|---|
| Username | superadmin |
| Password | superadmin — change immediately |
URLs
| Address | What it is |
|---|---|
http://localhost:3000 | Web application |
http://localhost:4001/api/v1 | REST API |
http://localhost:4001/api/docs | Swagger docs |
http://localhost:8080 | Admin panel / QR code |
Essential commands
docker ps                                     # check 5 containers running
docker logs svm-server-backend --tail 50      # backend logs
docker restart svm-server-backend             # restart backend only
docker compose down                           # stop all
docker compose up -d                          # start all
docker compose pull; docker compose up -d     # update (Windows PS)
docker compose pull && docker compose up -d   # update (macOS/Linux)
Install paths
| Platform | Path |
|---|---|
| Windows | C:\SVM\Server |
| macOS / Linux | /opt/seavesselmanager |
Getting the package
| Step | Where |
|---|---|
| Request access | https://seavesselmanager.com/request-access |
| Personal download link (emailed) | https://seavesselmanager.com/access/download.php?t=<TOKEN> — 7 days, 3 uses |
| Run the wizard (Windows) | powershell -ExecutionPolicy Bypass -File setup.ps1 |
| Run the wizard (macOS/Linux) | chmod +x setup.sh && ./setup.sh |
Licence
| Item | Value |
|---|---|
| Grace period | 30 days, no key required |
| Community Edition | Free, up to 4 vessels, never expires |
| Activate | Settings → License, or check /api/v1/license/status |